Materials Spotlight: Racks and Tubes

Meagan Ledendecker • March 21, 2022

Racks and Tubes, The Test Tubes. They may go by different names, but they’re all the same: a gloriously detailed Montessori division material. Introduced to the child any time between the end of their Children’s House experience or even in the older elementary years, the tiny parts of the material are beautiful and appealing. Adults who have had an opportunity to see the Racks and Tubes used are usually delighted by the way this physical material is able to help children understand more deeply how numbers are manipulated during division.


This is something so much more than when we learned long division with paper and pencil. Of course, that is taught simultaneously, but having the material can help everything make more sense.


The Material

A whole lot more complicated than math materials the child has previously used, there are many components, including:

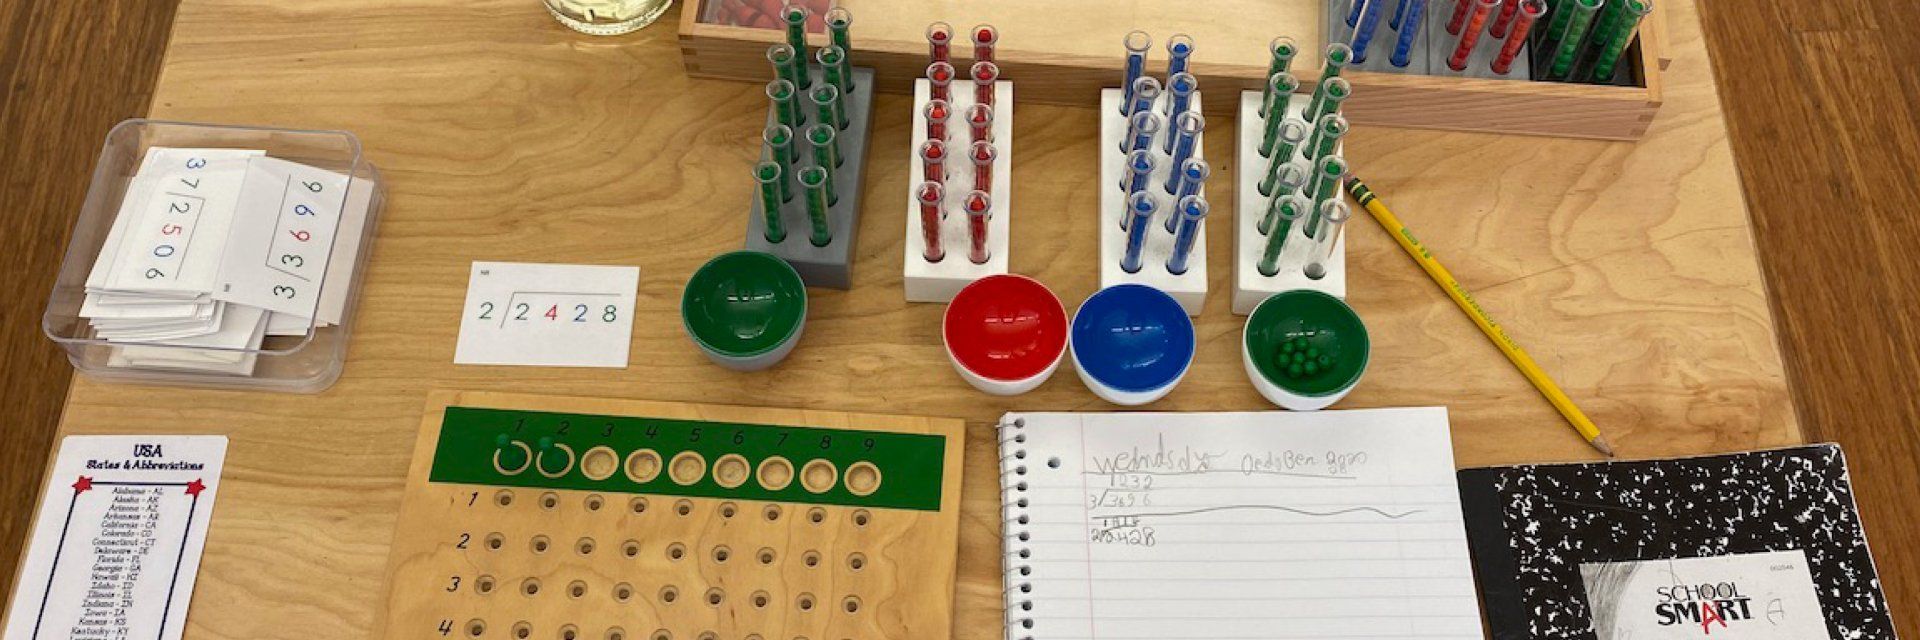
  • Seven test tube racks: Three of the racks are white and the tubes in each contain green beads (units/ones), while another has tubes filled with blue beads (tens), and the last is filled with red beads (hundreds). This pattern is repeated with three gray racks and tubes filled with beads (thousands, ten thousands, hundred thousands). The final rack is black, and its green beads represent millions.
  • Seven bowls with external colors to match the racks and internal colors to match the beads.
  • Three wooden frames, each with 81 holes in which beads may be placed.


The color scheme of green, blue, and red being representative of units, tens, and hundreds is repeated throughout many Montessori materials. The child will have already seen this when using the stamp game, bead frame, and checkerboard materials.


Setting Up

As an example, we will refer to the division problem 9,764/4=2,441. We begin by laying out the green board. The other boards will not be used for this problem, because the divisor (4) is only one digit. Larger problems require more boards (more on that later).


To represent the divisor, we will take out four green skittles and set them into place at the top of the board.


The first four racks are all we will need for this problem, so we will take those out along with their corresponding cups.


To make 9,764 we place the correct amount of beads in the appropriate cups: 4 unit beads in the unit cup, 6 ten beads in the ten cup, 7 hundred beads in the hundred cup, and 9 thousand beads in the thousand cup. The cups are then lined up neatly above the board.


Often at this stage in their mathematical development, students are recording their work on paper, so you would notice the child writing the problem down and filling in the answer as they go.


One Divisor

To begin solving the problem, it’s all about even and fair distribution. Starting with the thousand cup, beads will be placed beneath each skittle, one at a time, until all the beads are used up. The only catch is, the distribution cannot have any remainders (until we get to the last step with the units). This means that beneath each of the four skittles there will be two beads, with one left over.


By now, the child will be fairly proficient in exchanging across place values. They will know that one thousand is equal to ten hundreds, so the lone thousand bead will go back in its tube and ten red hundred beads will be put in the hundred cup.


The distribution continues with the hundred beads. After careful placement of each bead, there will be four underneath each skittle, with one leftover. This one hundred bead will be exchanged for 10 ten beads. This means there will now be 16 blue ten beads in the cup, which distributes evenly. The last step leads the child to distribute just four green unit beads, with one under each skittle.


The answer to a division problem is always what is found in one of the equal and fair groups, or what the child can count up underneath one of the skittles. The answer is always what “one” gets. In this case: 2 thousands, 4 hundreds, 4 thousands, and 1 unit, giving them the answer 2,441.


Long Division

When it comes to long division and completing more complicated problems with larger divisors, the racks and tubes are both elegantly and downright complicated. Reading a step-by-step description is not nearly as exciting (or clarifying) as seeing one completed in person. We strongly encourage you to observe this material being used in our elementary environment when you’re able.


In the meantime, we can give you the gist. Let’s say we are dividing 71,326 by 304. We would lay out the green, blue, and red boards (because there is a three-digit divisor). Three skittles would be placed at the top of the hundred board, zero would be placed on the ten board, and four would be placed on the unit board.


Beads to correspond with 71,326 would be distributed into their corresponding cups.


To begin distribution, the ten thousand cup would be placed above the hundred board, the thousand cup above the ten board, and the hundred cup above the unit board. One at a time, beads would be distributed across the skittles on all three boards. The student stops when they can no longer continue fair and even distribution.


Here, the child would pause and note how many hundred beads are beneath one of the unit skittles. This number is recorded on their paper, as it is part of the final answer.


The problem continues with cups sliding to new spots and beads being exchanged as needed. The distribution continues until the problem is complete.


This may all sound horribly tedious to an adult reading about it, but we can promise you it’s absolutely thrilling to the child who is discovering these number processes for the first time. We can also reiterate the fact that by using their hand to manipulate physical materials, the child is giving their brain visual scaffolding in which to solidify their understanding of division.


As we mentioned above, the very best way to see the magic of this special material is to watch it being used in person. We know that’s not always possible, but when you do have an opportunity we think you’ll be just as amazed as we were the first time we saw it.


Questions? Want to learn more about the Montessori approach to math? Contact us any time. We love to chat about our methods!

Preschool aged child sitting on the floor with a puzzle map of Australia
By Meagan Ledendecker June 1, 2026
Montessori geography materials help children explore the world through hands-on learning, imagination, and real-world discovery.
Two preschool aged children sitting at the top of a slide, smiling and holding hands
By Meagan Ledendecker May 28, 2026
Discover how Montessori nurtures intrinsic motivation by replacing rewards and punishment with curiosity, confidence, and self-discipline.
Image of a preschool aged girl standing in front of an ironing board with a spray bottle and fabric
By Meagan Ledendecker May 25, 2026
When children struggle, Montessori asks: what's in the way? Explore how the prepared environment helps children find their way back to themselves.
By Meagan Ledendecker May 18, 2026
If you've spent any time in a Montessori early childhood classroom, you've likely noticed the sandpaper letters on the shelf: elegant, tactile, traced by small fingers again and again. And if you've looked closely, you may have noticed something that surprises many families. Those letters are in cursive. In a world where most children learn to print first, Montessori's cursive-first approach raises questions. Why cursive? Why so early? The answers reach back to Dr. Maria Montessori's own careful observations of children, as well as forward to what modern neuroscience is now confirming about the developing brain. What Dr. Montessori Actually Observed Dr. Montessori was a meticulous observer of children, and her thinking about writing developed through years of direct experimentation. One of her core observations was that children naturally gravitate toward curved, flowing lines rather than the rigid, straight strokes that were (and often still are) the starting point for teaching print. She noticed this pattern across multiple contexts. When children who were learning to write began with rows of straight strokes, their attention would gradually drift, and the straight lines would slowly transform into curves, as if the child's hand were following its own natural inclination. And when children drew spontaneously by tracing figures in sand with a fallen twig, or scribbling freely on paper, they rarely produced short, straight lines. Instead, they made long, flowing, interlaced curves. Dr. Montessori paid attention. Rather than something random, she recognized the hand's natural motion expressing itself. Critical of standard teaching approaches that began with isolated geometric strokes, or regimented mark-making, Dr. Montessori saw that cursive script, with its connected, flowing letters, aligned far more naturally with the motions children were already making. It worked with the child's hand, rather than against it. The Neurological Case for Cursive Thanks to her keen observations, Dr. Montessori intuited benefits that research is now beginning to confirm. Modern brain science provides a compelling case for the value of cursive writing. This is especially powerful in early childhood, when the brain is forming the connections that will support reading, fine motor coordination, and cognitive development for years to come. Dr. William R. Klemm, writing in Psychology Today, summarized findings showing that learning cursive trains the brain to develop what researchers call “functional specialization,” or the capacity for optimal efficiency. Brain imaging studies show how multiple areas of the brain are activated simultaneously during cursive writing in a way that doesn't happen with typing or print. The integration of sensation, movement control, and thinking that cursive requires appears to support broader cognitive development in genuinely significant ways. Klemm also suggested that learning cursive trains the brain for more effective visual scanning, with potential benefits for reading speed and hand-eye coordination. In other words, the child who traces cursive sandpaper letters with their fingertips is developing neural pathways that support a wide range of future learning. Clarity, Beauty, and the Practical Benefits Beyond the neurological research, there are practical reasons that Montessori educators have observed over generations of practice. Cursive provides a better visual distinction between letters that are easily confused in print. Think about the pairs that trip up so many young learners: b and d, p and q. In cursive, these letters look different from one another, which reduces the visual confusion that causes so many children to struggle in the early stages of reading and writing. And then there is the matter of beauty, something Dr. Montessori took seriously in everything she prepared for children. She wrote that, in teaching writing, we should pay close attention to "the beauty of form" and "the flowing quality of the letters." Cursive handwriting, when developed well, is genuinely lovely. It is a form of penmanship that connects children to a long tradition of human expression through the written word. The Montessori approach treats handwriting as a craft worth caring about. What This Looks Like in the Classroom In a Montessori early childhood environment, the path to writing begins long before a child picks up a pencil. Practical life activities like pouring, spooning, buttoning, and lacing quietly help children develop the fine motor control and hand-eye coordination that writing requires. The sensorial materials train children’s pincer grip and refine the precision of small muscle movements. And the metal insets give children practice with the flowing, curved lines that build cursive letters. Then children begin using the sandpaper letters. While verbalizing the phonetic sound, children trace the letter with two fingers. Children feel the letter, produce its sound, and see its form. This multi-sensory experience engages multiple brain areas simultaneously and creates rich, layered associations that support both writing and reading development. By the time children are ready to write independently, they have been preparing their hand and mind for months, often without even realizing it. A Method Ahead of Its Time Dr. Montessori consistently arrived at insights that research has later confirmed. Her reasons for emphasizing cursive were rooted in direct observation of children. She watched children’s hands and their natural movements. She also looked to see what helped them and what created unnecessary struggle. Dr. Montessori wasn't following a trend or a theory. She was following the child. Decades later, brain imaging technology and developmental research are catching up to what Dr. Montessori saw. Flowing lines of cursive script, the sandpaper letters on the shelf, the careful preparation of the hand before children ever pick up the pencil. This is a deep and practical understanding of how children's minds and bodies actually work. For families curious about why Montessori makes this choice, the short answer is this: because children's hands already know how to make these movements. Montessori simply listens to what the hand is already telling us and builds from there. Visit our school in Lenox, MA and see the sandpaper letters and writing materials in action. We'd love to show you how the path to writing unfolds in Montessori.
Group of elementary students sitting cross legged on the floor looking at maps and timelines
By Meagan Ledendecker May 11, 2026
See how Montessori timelines make abstract time tangible for children, building historical thinking, imagination, and inner order through hands-on work.
Group of toddlers exploring various materials in a grassy, sunny outdoor space
By Meagan Ledendecker May 4, 2026
Discover how Montessori education nurtures children's deepest human needs — from exploration and meaningful work to belonging and spiritual growth.
Show More